3Dプリントの世界へようこそ!
3Dプリント愛好家の方なら、高品質な結果を得るために3Dプリントフィラメントと適切な印刷設定がいかに重要か、よくご存知でしょう。しかし、初心者のプリンターユーザーの中には、既に設定されている印刷ファイルをインポートする方法について、明確な説明を求める方もいるでしょう。
3Dプリンター用フィラメントは、素材そのものだけでなく、印刷プロセスでどのように使用されるかが重要です。この技術を習得する上で重要な要素の一つは、Bambu Studioなどのソフトウェアで印刷設定をインポートし、調整する方法を理解することです。
Bambu Studio の印刷設定ファイルをインポートするために必要な手順を詳しく見ていきましょう。これにより、3D 印刷用のフィラメントが最大限に活用され、毎回完璧な印刷結果が得られるようになります。
ステップ1
まず Bambu Studio ソフトウェアを開くと、このページが表示されます。


ステップ2
右側のインターフェースで「新規プロジェクトの作成」をクリックすると、「準備」ページが表示されます。(インポート方法を説明するために、Bambu P1SのPAHT-CF Coreを例として使用します)


ステップ3
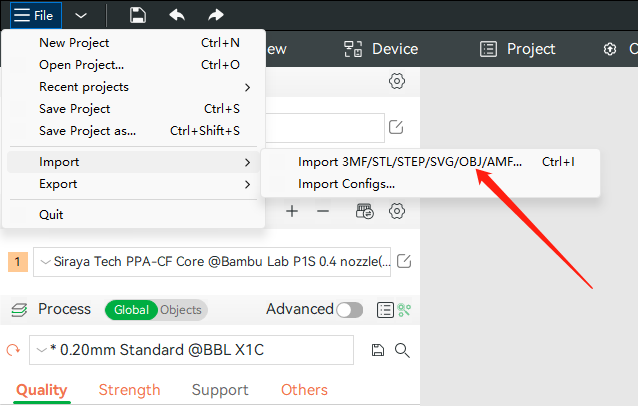
左側のインターフェースで「ファイル」ボタンを選択し、「プロジェクトを開く」をクリックして、ダウンロードしたプロファイル (3mf.) を選択します。


ステップ4
次に、ソフトウェアに「3mf には次のカスタマイズされたフィラメントまたはプリンターのプリセットがあります」というメッセージが表示され、ファイルが正常にインポートされたことが示されます。


ステップ5
プリセットモデルを削除すると、左側のパラメータは使用するフィラメントになります。


24 コメント
James
Importing this filament into the P2S is nightmare, and I don’t know who to point the finger to. When you import this file, the filament is imported, then I delete the model, and import (again) my new model, the Siraya Tech filament is overwritten. I had to open two Bambu studios and manually edit the filament of a recognized filament to the one that has the Siraya filament settings open in another. I wish there was a JSON so I can import into Bambu just the config of the filament like the other brands have.
Anonymous
Just distribute the JSON for the filament and printer profile.
Don’t make me open your project every time or have to unzip the thing to extract the information.
Dan
sample files here:
https://siraya.tech/pages/print-settings-download?srsltid=AfmBOorQ-vWAm6u5egmZStYCKYISU606uBYfFoaNgqDOf2GVvFsBSr6c
Bodi Szilamer
https://1drv.ms/u/c/ee3ce63e6906ad11/IQAAsDRNa8vhSbhYRj9XYbwkAVVm8neY2vqagtIYBdyngg0?e=ap4t7n
Here are the json files for TPU Air for P1S
Josh
There is no file to download in this article. Come on man!
richard
i bought some roles of Siraya Tech Fibreheart PET-CF 3D but can not find any profile for the bambu p2s . do you mind help me out ? anyone already have working settings ?
Scott Messina
I can’t find anywhere to download the 3mf file that you’re referring to for my P1S. Even if it WAS available for download, this process is pretty convoluted. Why not make it easier for everyone and just release json files?
Volta .
Sascha, you’re the MVP. Building on your work, I found most of the buggyness in the process seems to come from the Bambu Studio cloud sync, once I logged out of Bambu Studio the process was much more reliable. That enabled me to import the profiles using your technique, and export them back out as .json and .bbsflmt files to make it easier for others to import. I’ve only done X1C and H2D, posted at GitHub to make it easier for everyone: https://github.com/xVolta/bambu-studio-filament-profiles
Sascha
Ok, after two hours of faffing around I figured out how to properly import these profiles (probably)
First open each .3mf in turn and save a copy of the filament settings as a user preset, be careful to use a different name for each or they will overwrite in the file directory. Also save a copy of the process settings for each printer.
Second you need to find “inherits…” field in the .json files and just blank out the name of the profile already there (Leaving the quotation marks), otherwise the profile will try to import referenced settings from a non-existant profile and bambu studio will read it as invalid. On windows I think this is in appdata somewhere, on mac it’s under user/library/application support/bambustudio/user/[id number]/filament
Second you need to find the empty ""compatible_printers": ["… Field and replace it with
“compatible_printers”: [
“Bambu Lab H2D 0.8 nozzle”,
“Bambu Lab H2D 0.6 nozzle”,
“Bambu Lab H2D 0.4 nozzle”
],
Otherwise you will see the profile on every printer and nozzle size then invariably make a mistake somewhere later (Yes the profiles are different for each printer). Replace the H2D model above with whatever model & profile you have.
If the changes were made correctly the profiles should now show up in new projects and on the right printer/s. The process is buggy af and it might take a few tries.
P.S.
Siraya Tech, FFS please fix these presets and include .json files!!!! After spending $70 CAD on a spool of foaming TPU this is a user experience nightmare!
Chris
As others have asked, why can’t you just provide the json filament profiles instead of the 3mf files?
Tom
What is the point of giving customers profiles if you can’t save them as a user preset.
please supply a .json profile or give detailed instructions on how to save user preset.
thanks
Turk
Ive tried some of the suggestions here and none seemed to work. This worked for me in Orca 2.3.1
If you save as a User Preset, you can then go to the folder they are saved in. On Windows 11 it’s something like “c:\Users\USERID\AppData\Roaming\OrcaSlicer\user\default\filament\”. Open the .json file of the preset you just saved in a text editor, look in the json for “inherits”: “PROFILE NAME”, and clear out the PROFILE NAME so it looks like this “inherits”: "" then save it. Now when you create a new project you should see your User Preset profile.
Dimitri
After importing like above you need to go to the general import of filaments. There you can choose to save the current settings as a new material.
Jan
I am having the same issue, not being able to save the filament setting outside of this imported project.
The only work around i could find was to open the filament settings, screenshot all the setting and then open a new project, and create a new custom filament and 1 by 1 add all the settings from the Siraya Tech profile
Johnny
Also having an issue with saving the preset and accessing it from different projects in Bambu Studio. Any plans to update the profiles so that they can be saved correctly?
Kevin Kessler
Is there any reason you don’t just give us the filament and process profiles like normal companies, rather than sticking it some project file? I’d bet you’d get a lot less “this isn’t working right”, type of questions.
John
Christian Sean Caspers
Hover over Support on top of this website and then select ‘Print Setting Profile’
Also having the issue where saving the Filament Profile does not persist. Any help on this Siraya Tech?
Christian Sean Caspers
Where are the files at? This page tells us how to install in Bambu Studio, but it does not tell us where to get the 3MF files. Give me a link please.
James Hughes
Hi I’m having problems opening the profiles for Sirayatech Air Bambu Labs H2D. I right clicked each profile in turn and selected save as then saved as a .3mf file. But when opening in latest version of Bambu studio get an error saying no model and get no Filament profile loading in. Tried on all 3 temperature profiles
Sal
Used the above profile with my X1C and the .4 E3D nozzle without issue. I probably could benefit from being able to print above 300c but, that’s the max of my machine.
Steve
Same issue as @Fabio. The profile is not persisted.
altendky
i sent an email to support with a bit of info including a warning i’m getting when opening the .3mf which hopefully provides some hint to them about resolving this issue.
Fabio
I’m here because I’d like to save the filament preset! When I save it as a user preset and give it a name, it disappears after closing and reopening bambu studio.
ROLAND
Dear Siraya support. Are there any profiles for Flex 85A TPU and Bambu Lab A1/X1C?
Kind regards.