
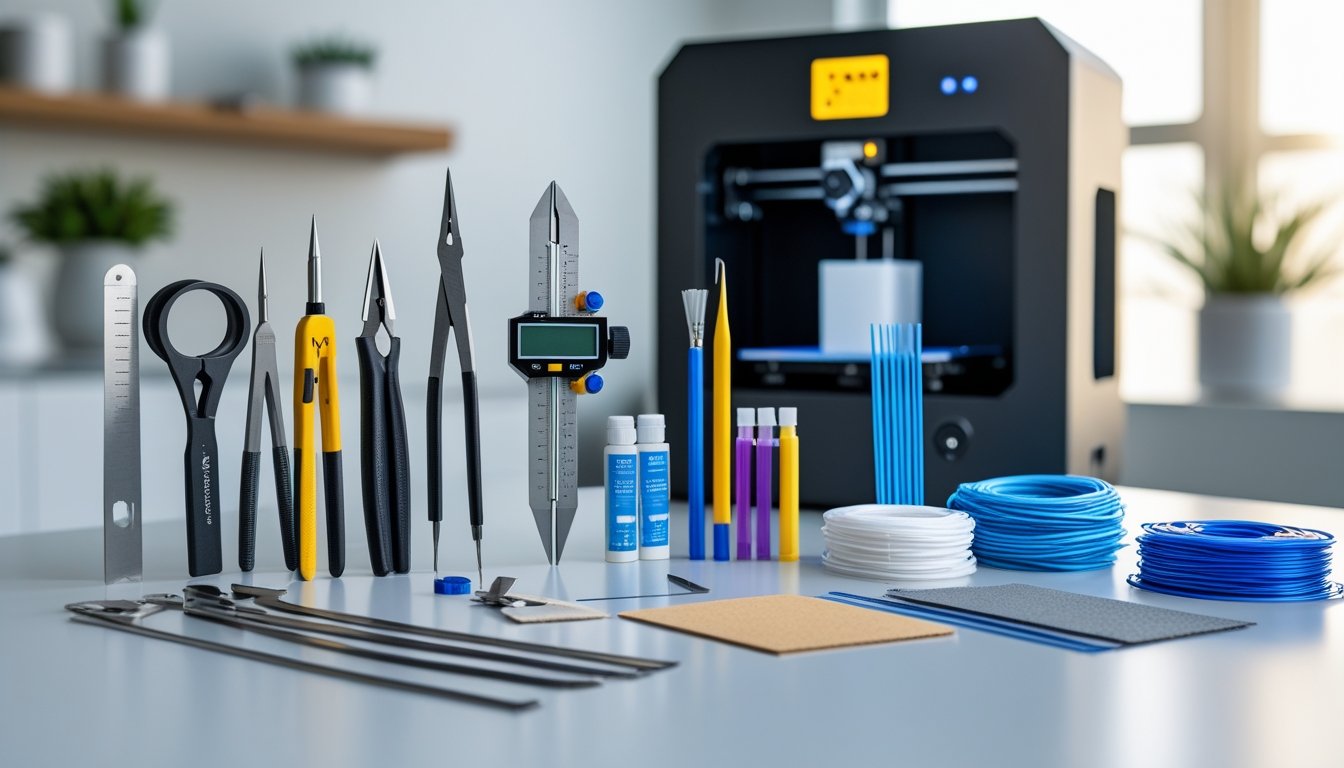
Having the must have tools for 3D printing makes the difference between frustrating print failures and smooth, successful builds. While your printer does the heavy lifting, the right tools help you prepare prints, maintain your machine, and finish parts to professional standards. Whether you're just starting out or upgrading your workshop, these essential tools will save you time and headaches.
Some tools prevent problems before they start, while others help you fix issues and perfect your finished prints. From simple scrapers to precision measuring instruments, each tool serves a specific purpose in your printing workflow.
This complete list covers everything you need to remove prints safely, keep your printer running smoothly, and transform raw prints into polished, professional-quality pieces.
Key Takeaways
- Digital calipers, scrapers, and cleaning needles are must-haves for accurate measurements, safe print removal, and regular maintenance
- Maintenance tools like lubricants and spare nozzles keep your printer humming and help you avoid downtime
- Post-processing tools—sandpaper, flush cutters, and finishing supplies—turn rough prints into polished, finished parts
Stock up on quality materials for your next project. Our 3D printing filament collection offers reliable performance and consistent diameter for clean prints that need minimal post-processing.
Essential Tools For Print Preparation And Removal

Getting prints off the bed safely and cleaning them up takes the right tools. You’ll want scrapers for popping models off the bed, cutters for removing supports, and some grippy tools for handling small parts and debris.
Scrapers And Spatulas For Bed Removal
A good scraper or spatula is your main weapon for removing prints without damaging them or the build plate. Go for thin, flexible metal blades that slip under prints easily. Some scrapers have both stiff and flexible edges for different jobs.
Sharp, angled blades work best. If your blade’s dull, you end up pushing harder, which can scratch PEI sheets or damage your print surface. It’s smart to keep a few different blade types since some prints just stick more than others.
Wide spatulas—think 3-4 inches—spread force out and work better than skinny ones. Metal palette knives are a solid, cheaper alternative. Skip regular kitchen tools, though—they usually have the wrong blade angle for 3D printing.
Cutting Tools And Flush Cutters
Flush cutters are great for snipping support material close to the model without leaving marks. Their flat edge lets you cut right up against the print. Regular wire cutters can leave little bumps that you’ll have to sand off later.
Hobby knives or utility knives handle larger supports and clean up stray strings or blobs. Different materials need different blades, so keep a few types handy. Swap out dull blades often—they’ll tear filament instead of slicing it cleanly.
Deburring tools smooth out holes and edges after you remove supports. They’re handy for cleaning up plastic burrs and making holes more precise for assembly. Some have replaceable blades for different hole sizes.
Tweezers And Needle-Nose Pliers
Tweezers come in clutch for grabbing tiny bits of filament, failed prints, and support scraps your fingers can’t reach. Grab a couple types—straight tips for basic stuff, angled for tight spots. Metal tweezers with serrated grips hold plastic better than smooth ones.
Needle-nose pliers give you more grip for stubborn supports and maintenance. You’ll use them to pull out supports, tighten hex keys, and handle hot parts. Wire-cutting pliers can double up for gripping and cutting jobs.
It’s worth keeping both needle-nose and regular pliers around since they each handle different chores. These also help when you’re installing printer upgrades or swapping nozzles. A decent pair will last and grip better than cheap ones that slip.
Tools For Cleaning And Maintenance

Regular cleaning and maintenance keep your 3D printer running well and help it last longer. The right tools—cleaners, lubricants, and more—help you avoid clogs, reduce wear, and dodge expensive repairs.
Nozzle Cleaning Needles And Brushes
Nozzle cleaning kits are absolutely essential. Most come with acupuncture-style needles in different sizes for common nozzle diameters—0.4mm, 0.6mm, 0.8mm. You use these to clear out clogs and stuck filament.
Wire brushes help clean the outside of the hot nozzle and remove stuck-on filament. Brass brushes work best—they won’t scratch your nozzle. Clean your nozzle before and after prints to avoid buildup that messes with print quality.
Keep your needles organized and store them safely. Most kits include a case for this. If a needle bends or gets damaged, just toss it—forcing it through can wreck your nozzle.
Isopropyl Alcohol And Cleaning Solutions
Isopropyl alcohol (IPA), 90% or higher, is the go-to cleaner for 3D printing. You’ll use it to wipe down your print bed, remove fingerprints and oils, and make sure the first layer sticks. Keep a spray bottle and some lint-free cloths close by for quick cleanups between prints.
IPA also works for cleaning resin prints if you’re using SLA. You can use it on tools, build plates, and printer frames. It evaporates fast and doesn’t leave residue.
Store IPA in a sealed container away from heat. Buying bigger bottles saves money—you’ll go through it. Microfiber cloths or even paper towels work for applying IPA.
Lubricants And Maintenance Supplies
Your printer’s moving parts need regular lube to keep things running smooth and quiet. Magnalube and Unilube are solid picks—they handle high temps and don’t attract dust. Lubricate your lead screws, rods, and bearings every few months.
Use PTFE-based lubricants for hot end heat breaks and threads. Avoid WD-40 or general oils—they’ll gum up over time. A little goes a long way; too much just attracts debris.
Basic screwdrivers help you tighten loose parts and do quick checks. You’ll want hex keys in common sizes for belts and securing parts. Keep all your maintenance stuff together so it’s easy to grab.
Ready to create detailed, smooth prints right off the build plate? Browse our 3D printing resins for high-resolution materials that work beautifully with your finishing tools.
Post-Processing And Finishing Tools

Fresh 3D prints usually have rough edges, support marks, and other imperfections that need cleanup. The right post-processing tools help you get rid of unwanted material, smooth everything out, and make sure your prints are on spec.
Sandpaper And Sanding Sticks
Sandpaper is the main tool for smoothing layer lines and getting a pro finish. You’ll want a range from 120 up to 3000 grit—start coarse to knock down big flaws, then work up to finer grits for a polished look.
Sanding sticks give you better control than loose sheets, especially on curves and corners. They’re basically foam-backed abrasives that flex to your print’s shape. You can make your own by wrapping sandpaper around craft sticks with double-sided tape.
Wet sanding with grits above 400 cuts down on dust and keeps the paper from clogging. Just keep a bowl of water handy and rinse the paper often. This works especially well on PLA and PETG if you want a glossy finish.
Files And Deburring Tools
Files remove material quickly from flat spots and edges where sandpaper isn’t enough. A basic set should have flat, round, and half-round files in coarse and fine cuts. Needle files are best for small details and holes.
A deburring tool is great for cleaning up the elephant foot effect on bottom layers and making printed holes more accurate. Its swiveling blade follows the contour and slices off thin lips of plastic from the first layer. With a little practice, you’ll find it more precise than a craft knife for edge work.
Put a cutting mat under your project to protect your desk when you’re using blades or files. A self-healing mat is worth it—your tools last longer, and you get a stable surface with measurement grids.
Calipers And Measuring Instruments
Digital calipers are your best friend for checking if prints match your design—down to 0.01mm. Use them to measure outer and inner dimensions, depths, and step heights. A good set costs $20-40 and lasts for years if you take care of them.
Check critical sizes while the print is still warm on the bed so you can catch issues early and tweak your slicer before running more copies. Measure holes for hardware or moving parts that need tight tolerances.
A permanent marker is handy for marking cut lines or spots that need extra finishing. Mark measurements right on the print before pulling it off the bed. Keep your calipers clean and stored in their case to keep them accurate.
Take your resin prints to the next level with professional finishing supplies. Explore our resin art supplies collection for everything you need to polish, seal, and perfect your creations.
Conclusion: Must Have Tools for 3D Printing
Building a solid toolkit transforms your 3D printing experience from frustrating to efficient. These must have tools for 3D printing handle everything from basic maintenance to professional-level finishing work. Start with the essentials and add specialized tools as your skills and projects demand more.
Quality tools pay for themselves by preventing damage to prints and keeping your printer in top condition. A well-stocked workspace means less downtime and better results on every project.
Looking for creative ways to use your new toolkit? Discover our guide on 3D printed gifts and custom ideas for inspiration that puts your tools and skills to work.
Frequently Asked Questions: Must Have Tools for 3D Printing
New 3D printer owners usually wonder what tools they actually need and how to get started without a hitch. The right gear depends on whether you’re setting up, maintaining, or just refining your prints. Knowing some basics helps you avoid the usual rookie mistakes.
What tools are necessary for 3D printing?
You'll need assembly tools like screwdrivers, hex keys, and wrenches to put together printer kits and secure the frame. Maintenance tools include wire cutters, a multimeter, nozzle cleaning needles, and spare nozzles for clogs and repairs. Digital calipers check filament diameter and part accuracy, while glue sticks or painter's tape improve bed adhesion.
What are the top 10 things to 3D print?
Storage solutions like phone stands, cable organizers, drawer dividers, and tool holders are perfect beginner projects. Replacement parts such as knobs, brackets, mounting clips, and drawer pulls showcase practical applications. Decorative items like figurines, plant pots, wall art, and desk toys help you master supports and print orientation.
What do I all need for a 3D printer?
Your basic setup needs the printer, power supply, sample filament, and a sturdy table that handles vibration. Sealed containers with desiccant keep filament dry and maintain print quality. Slicer software like Cura or PrusaSlicer converts 3D models into printer instructions.
What is the 45 degree rule in 3D printing?
Overhangs steeper than 45 degrees from vertical typically need support structures to print successfully. Angles under 45 degrees usually print fine as each layer grabs the previous one adequately. You can avoid supports by rotating models on the print bed or splitting parts into flat-printing pieces.