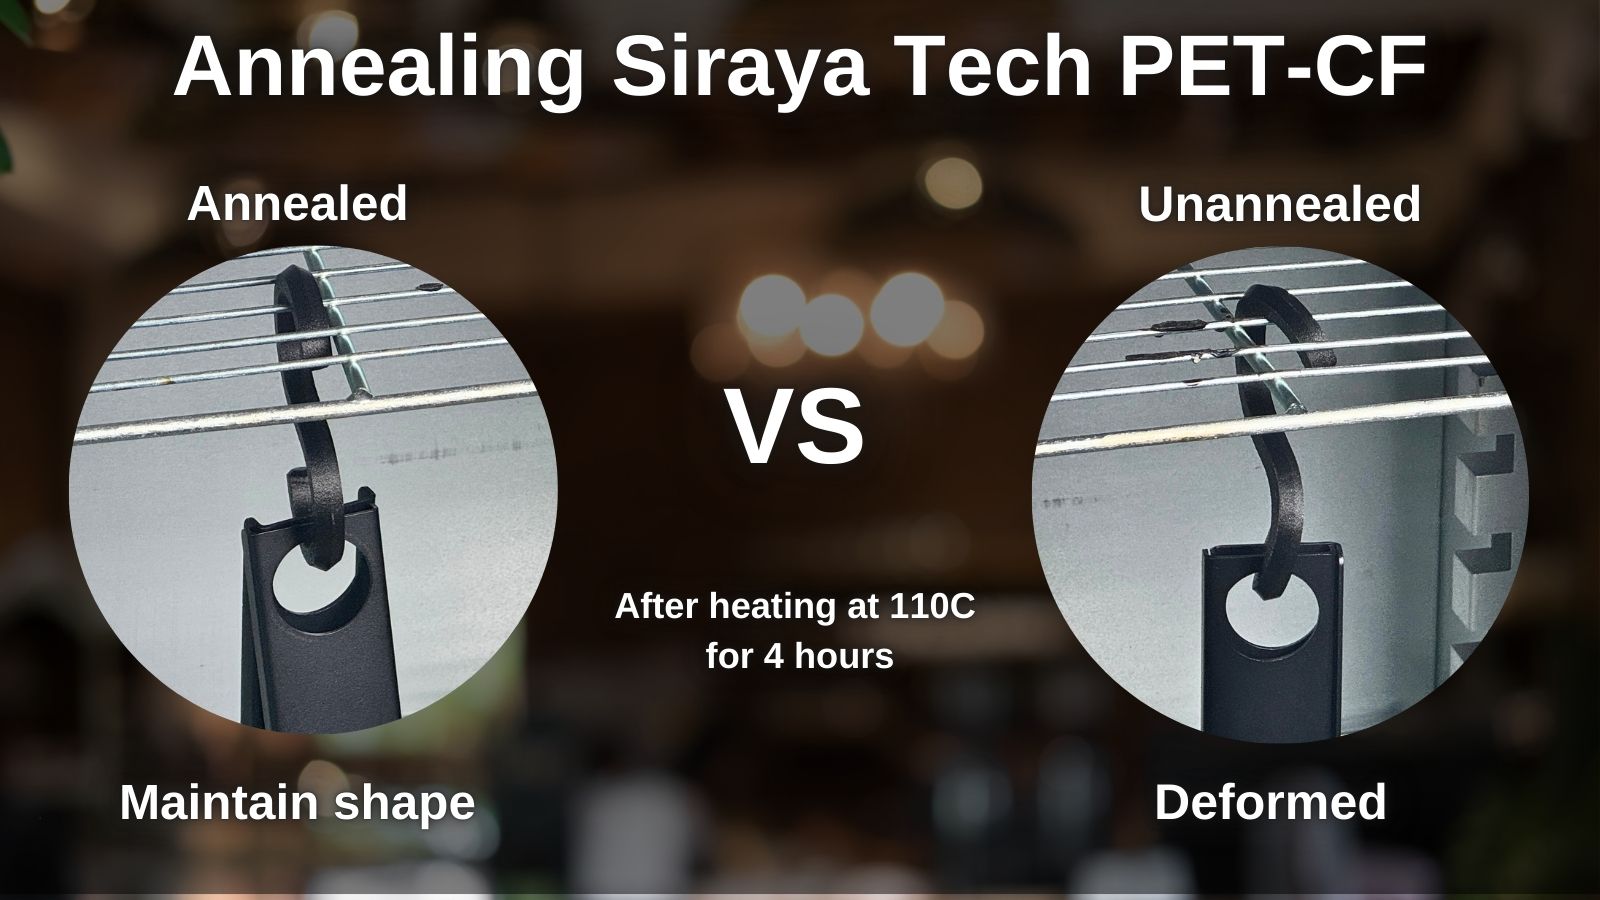
Introduction
Siraya Tech's PET-CF filament represents a significant advancement in 3D printing materials, combining the reliability of PET with the enhanced properties of carbon fiber reinforcement. While the material already offers excellent performance out of the printer, annealing can further improve its mechanical properties and dimensional stability. This guide will walk you through the annealing process and its benefits.
Understanding PET-CF Properties
Before diving into the annealing process, let's understand what makes PET-CF special:
-
Enhanced Performance & Reliability: Expertly blending PET with carbon fiber for increased strength and stiffness.
-
Smart Fiber Reinforced Technology: Carbon fibers form a mesh structure, enhancing mechanical properties and dimensional stability.
-
Superior Dimensional Stability: Reduced warping and shrinkage, maintaining precise dimensions and shapes.
-
Lightweight Durability: Balancing strength with a lightweight profile, ideal for durable yet lightweight components.
-
Versatile Applications: Suitable for professionals and hobbyists alike, offering ease of printing and high-strength results.
Why Anneal PET-CF?
Annealing PET-CF can provide several benefits:
-
Increased Crystallinity: Heat treatment allows polymer chains to realign, increasing the material's crystalline structure
-
Enhanced Heat Resistance: Higher crystallinity can improve heat deflection temperature (HDT)
-
Better Mechanical Properties: Can increase strength and stiffness
-
Reduced Internal Stresses: Helps eliminate printing-induced internal stresses
| Mechanical Properties | Unannealed | Annealed | Method |
| Tensile Stress at Break (MPa) | 65 | 60 | ISO 527 |
| Young’s Modulus (MPa) | 4680 | 5300 | ASTM D638 |
| Elongation at Break(%) | 2.9 | 1.9 | ASTM D638 |
| Charpy impact strength (KJ/m^2) | 7 | 5 | |
| Bending Strength (MPa) | 95 | 92 | |
| Bending Modulus (MPa) | 4450 | 4730 |
Annealing Process Guide
Equipment Needed:
-
Laboratory or kitchen oven with accurate temperature control

-
Temperature probe for verification (recommended)
-
Flat, heat-resistant surface
-
Heat-resistant container or tray

-
Timer
Step-by-Step Process:
1. Prepare Your Parts- Clean the printed parts thoroughly
- Remove any support structures
- Ensure parts are completely dry
- Preheat oven to 90 °C
- Verify temperature with external probe if available
- Allow temperature to stabilize for 15-20 minutes
- Bury the parts in sand or salt (Please place a layer of salt/sand on the bottom before burying the parts)
- Ensure parts aren't touching each other
-
Place parts in the preheated oven
-
Set timer for 4 hours
-
Maintain consistent temperature throughout the process
-
DO NOT open the oven during annealing

-
After the annealing period, turn off the oven
-
After cooling naturally in the oven for about 0.5 - 1 hour, take out the container containing the parts and place it indoors to cool naturally (You can also leave parts in the oven to cool gradually).
-
Do not remove parts from sand/ salt until reach room temperature
-
This typically takes 4-6 hours or overnight
Important Considerations
1. Dimensional Changes-
Expect slight dimensional changes during annealing
-
Parts may shrink by approximately 0.3%
-
Design parts with compensation for shrinkage if necessary
-
Complex geometries may experience varying shrinkage rates
-
Accurate temperature control is crucial
-
Avoid temperature spikes or fluctuations
-
Consider using an oven with digital control and display
-
Regular calibration of oven temperature is recommended
-
Thicker parts may require longer annealing times
-
Uniform wall thickness helps ensure even crystallization
-
Consider internal support structures for hollow parts
-
Allow for proper air circulation in part design
Troubleshooting Common Issues
Problem: Warping During Annealing
1. Possible Causes:- Temperature too high
- Uneven heating
- Poor part support during annealing
- Verify oven temperature accuracy
- Ensure level placement
- Consider using sand support
Testing and Validation
To verify the success of your annealing process:
1. Dimensional Measurement-
Measure parts before and after annealing and see if the size of annealed part has changed more than 1%
-
Document any changes in size
-
Check for warping or distortion
-
Compare heat deflection before and after by placing parts in oven and heat it up to 110C with load
-
Document improvements

Conclusion
Annealing PET-CF can significantly enhance its properties when done correctly. While the process requires attention to detail and proper equipment, the benefits in terms of improved mechanical properties and heat resistance make it worthwhile for many applications.
Remember to always follow proper safety procedures and consult material safety data sheets before beginning any heat treatment process.
Additional Resources
-
Video tutorials

