
If you are working with resin 3D printing, you know how important it is to clean your prints properly is for the best results.
Cleaning resin prints removes the uncured resin and other residues that can leave your model sticky or blotchy. It also helps your print cure fully, look great, and last longer.
This article will share expert advice on how to clean resin prints safely and efficiently, so every model you make is flawless and ready for finishing.
Quick Takeaways:
- Always clean resin prints immediately after printing.
- Use 95% or higher isopropyl alcohol (IPA) or water (for water-washable resin) in multiple rinses.
- Gently agitate the print in a wash station or container for 2–5 minutes.
- Dry prints fully before UV curing to avoid white marks.
- Handle with gloves, goggles, and proper ventilation.
3D Resins You May Want to Shop
Explore More


Why Cleaning Resin Prints Is Important
Cleaning isn’t just a quick rinse, it’s a crucial part of resin printing that directly affects how your final piece looks and performs.
Leaving even small traces of uncured resin can cause problems during curing and long-term use.
Prevents Sticky and Cloudy Surfaces
If resin remains on the surface, it can cure unevenly. This leaves prints tacky or gives them a frosted look instead of a smooth, matte finish. Proper washing ensures all uncured resin is removed before curing, which gives a clean, consistent texture.
Improves Durability and Finish
When the surface is free of leftover resin, the UV light can cure the model evenly. That means a stronger structure and better surface detail.
It also prevents cracks or weak spots that sometimes appear when resin doesn’t cure properly.
Ensures Safer Handling
Liquid resin can irritate your skin or cause allergic reactions. Washing your prints properly removes all residue, making them safe to touch and paint later on.
📖 Also Read: 8 Main Types of Resin for 3D Printing
What You’ll Need to Clean Resin Prints
You don’t need expensive tools to get great cleaning results, but having the right setup helps keep your process smooth and consistent.
Tools and Materials
Here’s a list of what you’ll need:https://siraya.tech/blogs/news/types-of-resin-for-3d-printing
- Isopropyl Alcohol (IPA, 95% or higher) – The most effective cleaner for standard resin.
- Resin Cleaning Solution – An alternative to IPA, often reusable and less flammable.
- Two Containers or a Wash and Cure Station – One for washing, one for rinsing.
- Soft Brush or Toothbrush – For scrubbing off resin in fine details.
- Nitrile Gloves – Protect your skin from contact with resin and alcohol.
- Paper Towels or Lint-Free Cloth – For drying your prints and wiping tools.
- Plastic Tongs or Tweezers – To handle prints safely during washing.
Safety Tips
Resin printing involves chemicals, so always take precautions:
- Wear nitrile gloves, eye protection, and a mask if possible.
- Work in a ventilated area to avoid breathing fumes.
- Never pour used IPA down the drain. Filter and dispose of it safely following local waste guidelines.
- Keep cleaning supplies away from open flames or other heat sources, as IPA is flammable.
📖 Also Read: How to Make Prints Made With Simple Clear Resin Transparent After Cleaning
Step-by-Step Guide on How to Clean Resin Prints
Knowing how to clean resin prints properly ensures a smooth finish, accurate details, and long-lasting quality. The cleaning stage is just as important as printing itself.
With the right technique, your resin models will cure evenly and maintain their shape. The entire process takes about 10 to 15 minutes.
Step 1: Remove Excess Resin
After printing, raise the build plate and allow excess resin to drip back into the vat. This helps prevent waste and makes cleaning easier.
Carefully use a scraper or spatula to remove the model without damaging delicate parts. Let the resin drip naturally before wiping.
You can use paper towels to dab away thicker spots gently.
📌 Pro tip: Set up a small drip area lined with a silicone mat when working on multiple prints. This keeps your workspace clean and resin-free.
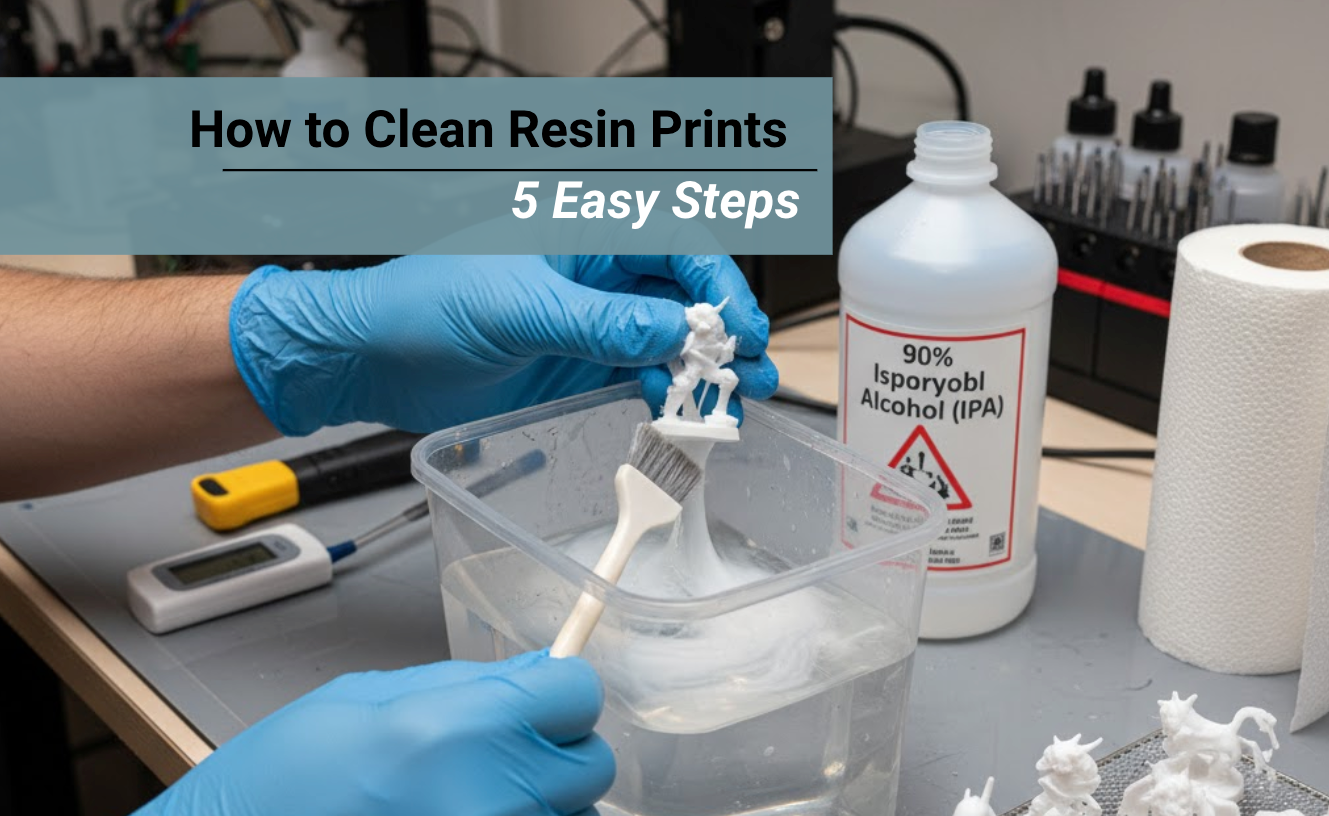
Step 2: Wash the Print
The next step in resin print cleaning is washing off the uncured resin. Submerge your print in a container filled with isopropyl alcohol (IPA) or a dedicated resin cleaner.
Swirl the print for 2 to 5 minutes to dissolve any leftover resin. If you have a wash and cure station, use the wash mode for even cleaning.
Alternative method: An ultrasonic cleaner can also be used. It removes resin from tiny crevices using vibration. Always confirm that your cleaning solution and resin type are compatible before using one.
Step 3: Cleaning Siraya Tech Simple Resin Prints

If you are using Siraya Tech Simple Resin, follow a gentler process. Simple Resin dissolves more easily, so quick cleaning is key.
Here’s the recommended method:
- Mix a 15% alcohol solution (1 part 90% alcohol with 5 parts water). Stronger alcohol is unnecessary.
- Use a soft painter’s brush or natural-hair brush to remove resin from the print surface.
- Do not soak the print for more than 30 seconds. Prolonged soaking can soften or deform the model.
- Clean quickly in 4 to 6 short cycles, lasting 2 to 3 minutes in total.
- Immediately dry using a hairdryer or air blower. Avoid slow air drying or placing the model in sunlight before curing.
- For prints with complex details or internal cavities, repeat the wash-and-dry process several times.
- Touch the surface to check. If it feels sticky, wash again and dry once more.
This fast, controlled process protects your Siraya Tech Simple Resin prints from overexposure to alcohol or water while ensuring a residue-free finish.
Step 4: Brush for Detailed Models
When cleaning detailed prints, use a soft-bristled brush to reach small corners and engraved textures. Gentle brushing removes resin trapped in fine details.
Avoid hard brushes, as they can scratch or distort the surface.
Step 5: Rinse and Dry
Move your print to a second container of clean IPA or fresh cleaner to remove any remaining residue.
This double-rinse technique prevents cloudy surfaces. Allow the model to air dry for several minutes or use compressed air to speed up drying.
If you are using water-washable resin, rinse the model under running water instead. Do not pour used water directly into the drain, since it still contains resin particles.
Always filter and UV-cure waste water before safe disposal.
Step 6: Post-Cure the Print
Once your model is completely dry, it’s ready for the post-curing stage. Place the print under a UV curing lamp or in direct sunlight for 2 to 10 minutes.
Rotate it every few minutes to ensure even exposure on all sides. Proper curing strengthens the print and improves surface quality.
A well-cleaned and cured print should have:
- A smooth, non-sticky surface
- Even hardness and consistent texture
- Improved strength and color quality
Extra Tip for Best Results
Keep your IPA wash clean. Dirty or cloudy alcohol will spread uncured resin instead of removing it. For best results, use two cleaning containers, one for the initial rinse and one for the final rinse.
Replace your alcohol when it turns cloudy or loses clarity. This simple habit ensures consistent, high-quality finishes.
📖 Also Read: What Is Casting Resin?
Best Cleaning Methods for Resin Prints Compared

There are a few effective ways to clean resin prints, and the right choice depends on your workflow, budget, and model size.
Each method has its own advantages and limitations.
Manual Cleaning
Manual cleaning is the simplest and most budget-friendly method. It involves placing your prints in a container filled with isopropyl alcohol (IPA) and gently shaking or stirring them by hand. This approach is great for hobbyists and small batches.
✅️ Pros:
- Low-cost setup with basic materials
- Easy to control cleaning time and intensity
❌ Cons:
- Not suitable for large or highly detailed models
- IPA becomes dirty quickly and needs frequent replacement
Ultrasonic Cleaner
An ultrasonic cleaner uses high-frequency sound waves to create tiny vibrations in the cleaning solution. These vibrations reach every small crevice of your print, effectively loosening uncured resin.
It’s an excellent choice for detailed or professional-grade models.
✅️ Pros:
- Deep and even cleaning for complex prints
- Produces professional-quality results
❌ Cons:
- Uses more cleaning liquid or IPA
- Requires careful monitoring to prevent print damage
Wash and Cure Station
A wash and cure station combines cleaning and UV curing in one device, making it the most efficient all-in-one option.
It automates the process, saving time while keeping your workspace cleaner and safer.
✅️ Pros:
- Saves time and reduces manual handling
- Delivers consistent, repeatable results
- Keeps resin handling safer and more organized
❌ Cons:
- Higher upfront cost than manual cleaning
- Limited to prints that fit within the station’s size capacity
Each method can achieve excellent results when used correctly. Beginners often start with manual cleaning, while regular resin users prefer wash-and-cure stations for convenience and consistency.
📖 Also Read: Troubleshooting Resin 3D Printing Failures Caused by Improper Support
Common Mistakes to Avoid When Cleaning Resin Prints
Even skilled users can make small cleaning mistakes that affect print quality, durability, and surface smoothness. Knowing what to avoid can save time, materials, and frustration.
Here are the most common errors to watch for when cleaning resin prints:
1. Using Dirty or Reused IPA
Reusing the same alcohol for too long is one of the biggest causes of cloudy or sticky prints. Dirty IPA contains dissolved resin particles that settle back on the surface, giving your model a greasy or uneven finish.
How to fix it:
- Replace your IPA when it starts to look cloudy or milky.
- Use two rinse containers, one for the first wash and one with clean alcohol for the final rinse.
- Store your IPA in a closed container to reduce evaporation and contamination.
2. Overwashing the Print
Leaving prints submerged in IPA for too long can soften details, cause micro-cracks, or warp flexible parts. Excess exposure breaks down some resins, especially delicate ones like Siraya Tech Simple Resin.
Best practice:
- Keep total washing time between 2 and 5 minutes.
- Avoid soaking prints for long periods.
- For Simple Resin, limit contact with alcohol or water to 30 seconds per rinse and dry immediately.
3. Skipping Post-Curing
Skipping the UV curing step after washing is a common mistake that leaves the print weak and tacky. Washing removes uncured resin, but it does not complete the hardening process.
Why it matters:
- Post-curing completes polymerization, giving the print its full strength and stability.
- Always cure for the recommended time, usually 2 to 10 minutes under a UV lamp or sunlight.
- Rotate your print for even exposure to prevent uneven hardness or discoloration.
4. Touching Wet or Uncured Prints
Even after washing, uncured resin may still irritate your skin. Handling wet prints without gloves can lead to skin reactions or residue transfer that affects later curing.
What to do:
- Always wear nitrile gloves during cleaning and curing.
- Let prints dry completely before touching them.
- Use tweezers or tongs when moving wet models between cleaning containers.
5. Using the Wrong Cleaning Solution
Not every cleaning agent is safe for resin prints. Harsh solvents such as acetone, paint thinner, or alcohol with additives can damage the model’s surface or make it brittle.
Use the right cleaners:
- Stick to isopropyl alcohol (IPA), ethanol, or dedicated resin cleaners designed for 3D printing.
- Avoid any product that contains acetone or strong degreasers.
- For water-washable resins, rinse only with clean water; do not pour resin waste down drains.
By following these simple practices, you’ll avoid the most common cleaning mistakes and keep your resin prints looking clear, strong, and professional every time.
Final Thoughts
Knowing how to clean resin prints properly is just as important as choosing the right resin or printer settings.
Proper washing and curing ensure that every print looks sharp, feels solid, and lasts longer. Clean resin prints also paint better, handle heat more effectively, and stay dimensionally stable over time.
Take your time with the process; careful cleaning pays off in smoother finishes and fewer print failures.
Whether you’re using a manual setup or a wash-and-cure station, consistency and cleanliness are what set professional results apart.
👉 Ready to take your resin printing to the next level? Explore high-performance Siraya Tech resins that are easier to clean and deliver stronger, tougher prints:
FAQs About How to Clean Resin Prints
What is the Best Thing to Clean Resin Prints With?
The best cleaner for resin prints is isopropyl alcohol (IPA) with a concentration of 90% or higher. IPA effectively dissolves uncured resin left on the surface of your print, leaving it smooth and ready for curing. You can also use dedicated resin cleaners or water-based solutions for less harsh cleaning. Always agitate the print gently during cleaning to avoid softening or damaging fine details.
Can Rubbing Alcohol Be Used to Clean Resin Prints?
Yes, rubbing alcohol can be used to clean resin prints if it has a high enough alcohol content, ideally 90% or more. Lower concentrations may not fully remove uncured resin and can leave a sticky residue. Make sure to replace the alcohol once it becomes cloudy or filled with resin particles. After cleaning, let the print dry completely before UV curing.
Is Siraya Tech Resin Water Washable?
Yes, Siraya Tech offers water-washable resin options that clean up easily with regular tap water rather than IPA. These resins are convenient and reduce chemical exposure during post-processing. However, even water-washable resins still contain uncured material, so always wear gloves and properly dispose of the rinse water. Avoid pouring used wash water directly down the drain.
How Do I Dispose of Used IPA or Water?
Used IPA or rinse water contains uncured resin, which is toxic and should never be poured down the sink. Instead, leave the liquid in a clear container exposed to sunlight or UV light until all resin particles cure and harden. Once solidified, you can filter out the cured bits and dispose of them as regular plastic waste. The remaining clear liquid can be reused or taken to a local hazardous waste facility.
How Long Should Resin Prints Soak in IPA?
Resin prints should soak in IPA for about 2 to 5 minutes, depending on the model’s size and detail. Avoid leaving them submerged for too long, as extended soaking can soften fine features or cause warping. Gently agitating the print or using a wash station helps remove uncured resin more effectively. Once clean, rinse and dry before moving to the curing step.