
High-performance engineering filaments like PPA-CF, PPA-GF, PET-CF, and Polyphenylene Sulfide (PPS) have revolutionized functional 3D printing. With extreme stiffness, metallic-like rigidity, and thermal resistance reaching well over 200°C, these materials—especially advanced options like Siraya Tech PPA-CF and PPA-GF—are the holy grail for load-bearing parts.
However, these incredible physical properties present a unique physical challenge: extreme brittleness before printing.
If you try to feed these wire-stiff filaments through standard, tightly curved PTFE routing systems on your Bambu Lab H2C, H2D, or H2S, you will inevitably face snapped filament, clogged toolheads, or jammed feeder gears.
In this comprehensive guide, we will break down exactly how to prep your Bambu Lab H2-series printer, configure your material feed path, and optimize your slicer settings to achieve flawless, high-strength prints without the headache of brittle breaks.
Why Rigid Filaments Snap in Bambu Lab Printers
Standard consumer filaments like PLA, PETG, and even basic Nylon are ductile enough to bend around sharp corners.
Advanced engineering composites like Siraya Tech PPA-CF Core or PET-GF are packed with 15% to 25% carbon or glass fibers. When coiled on a spool, the filament acts like a tightly tensioned spring.
When forced through standard routing paths:
-
The Cable Chain Trap: The toolhead moves rapidly. If your PTFE guide tube is tucked tightly inside the energy chain, the filament undergoes sharp bending angles when the print head reaches the far right limits of the print bed. This causes the filament to snap inside the tube.
-
The Spool-End Hazard: As you reach the end of a spool, the filament's natural "curve" (coil memory) becomes extremely tight. Forcing this highly curved, rigid plastic to flatten out instantly creates high tensile stress, leading to a break.
-
High Feed Resistance: Brittle filaments are highly sensitive to friction. Standard, long Bowden routings create drag, making the extruder pull harder and causing the gears to bite and chew through the material.
Step 1: Deep-Drying is Non-Negotiable
Before modifying your printer, you must prepare the material. High-temperature nylons (PPA) and PET polyesters are highly hygroscopic (they rapidly absorb moisture from the air). Wet filament is significantly more brittle than dry filament.
|
Filament Type |
Recommended Drying Temp |
Minimum Drying Time |
|
Siraya Tech PET-CF / PET-GF |
80°C |
6–8 Hours |
|
Siraya Tech PPA-CF / PPA-GF / PPA Core |
85°C – 90°C |
8–12 Hours |
Pro Tip: Keep the filament in an active heated dry box while printing. If the ambient relative humidity (RH) rises above 20%, the filament will begin absorbing moisture mid-print, degrading both surface quality and structural strength.
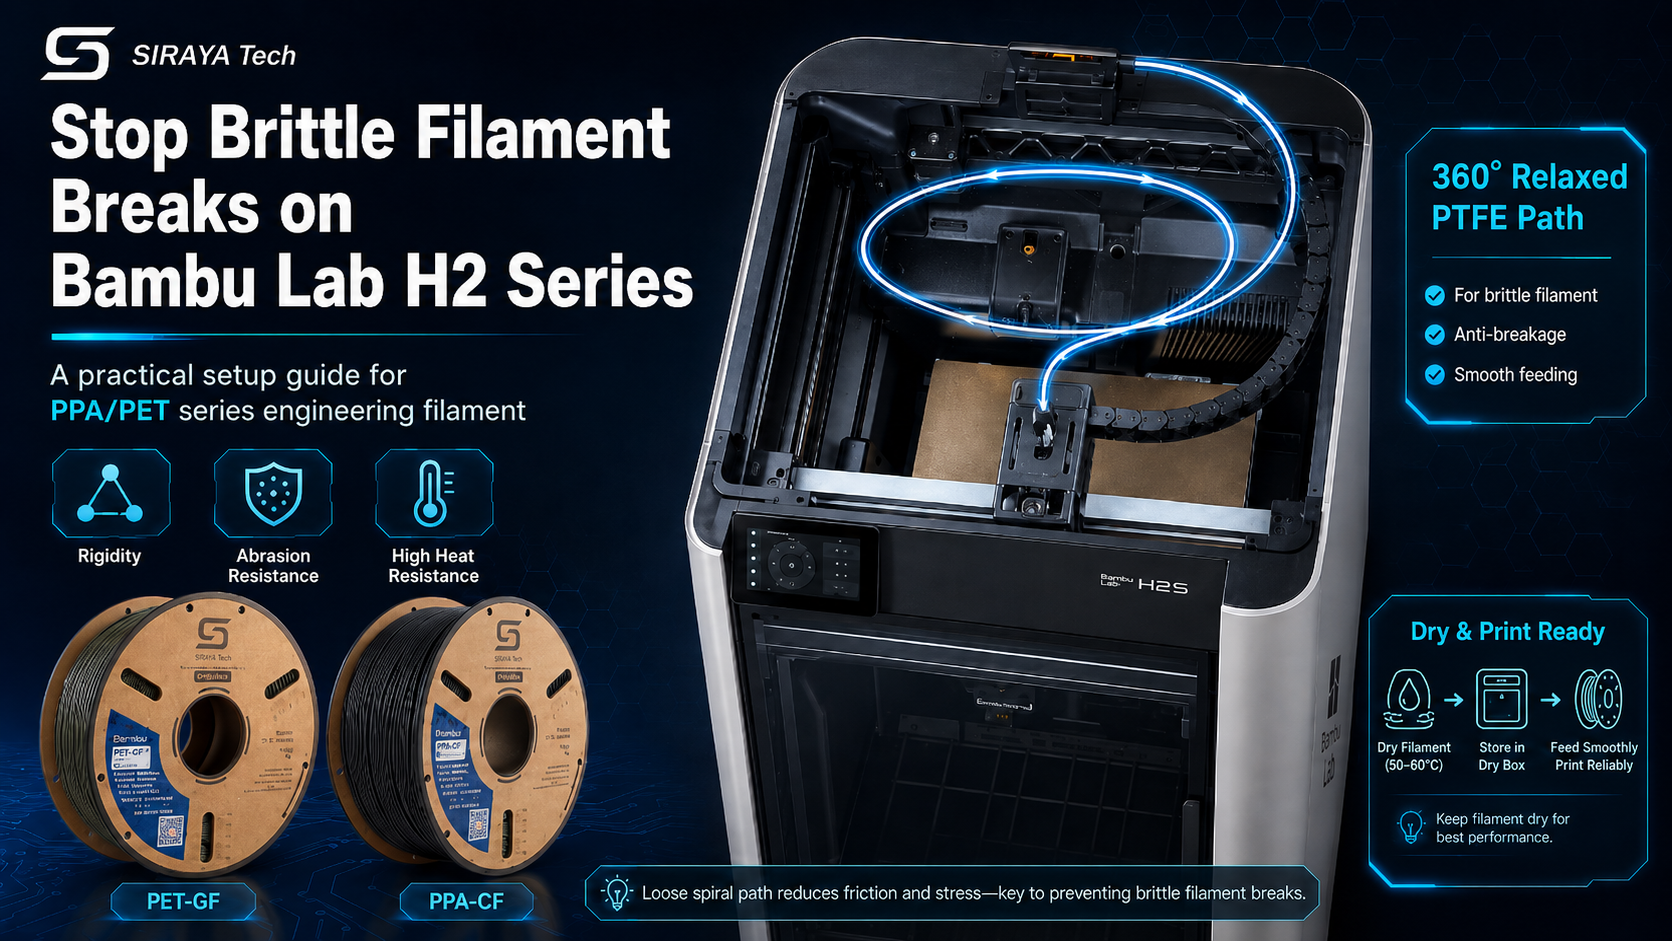
Step 2: The "360° Spiral" PTFE Tube Modification
To print these rigid materials on your Bambu Lab H2S, H2C, or H2D, you must bypass the standard cable chain path to eliminate tight bends.
How to set up a zero-tension filament path:
- Unroute the Tube: Open your printer's top enclosure cover. Carefully pull the main PTFE guide tube out of the toolhead and extract it completely from the plastic cable chain bracket.

- Create the Helical Loop: Rotate the PTFE tube 360 degrees counterclockwise.

- Insert Into Toolhead: Reinsert the end of the tube back into the toolhead.
-
-
Why this works: This creates a loose, sweeping spiral loop floating above your toolhead. As the extruder travels to the far corners of the build chamber, this loop gently expands and contracts, ensuring the filament is never subjected to a sharp bend.
-
[ Floating Spiral Loop ] <-- Relaxed, wide bending radius
/ \
( Toolhead ) ( Back of Printer )

Step 3: Setting Up a Low-Resistance External Feed
Do not run carbon fiber or glass fiber filaments through an AMS (Automatic Material System). The abrasive fibers will quickly wear down the internal plastic gears, and the tight curves of the AMS multiplexer will snap the filament.
Instead, feed directly from an external source:
-
Keep it Short: Cut a section of high-quality PTFE tubing to approximately 15 cm.
-
Insert into Rear Intake: Insert this short tube directly into the filament intake port on the rear of your Bambu Lab printer, pushing it all the way to the bottom.
-
Elevate Your Dry Box: Place your active heated dry box on the right-rear side of the printer. Elevate it on a stand or block so the dry box outlet aligns horizontally with the printer’s intake.
-
Feed Manually: Manually push your filament from the dry box into the toolhead. Heat your hotend to 310°C–340°C (depending on the material spec), and feed the material using the printer's manual control panel until it extrudes cleanly.
Step 4: Slicer Settings for Brittle & Abrasive Filaments
Now that the physical pathway is optimized, update your Bambu Studio or OrcaSlicer settings to protect your hardware and ensure flawless extrusion:
1. Nozzle Requirements
-
Hardened Steel is Mandatory: Carbon and glass fibers act like sandpaper. A standard brass nozzle will be ruined within hours.
-
Nozzle Diameter: Use a 0.4mm hardened steel nozzle at minimum, though a 0.6mm nozzle is highly recommended. The larger orifice drastically reduces backpressure, prevents clogs from fiber clusters, and allows you to print wider, stronger line widths.
2. Slow Down the Retractions
Fast, frequent retractions place immense mechanical stress on brittle filaments.
-
Retraction Length: Keep this between 0.5mm and 1.2mm for direct-drive.
-
Retraction Speed: Reduce your retraction speed to 25–30 mm/s. This prevents the extruder gears from chewing flat spots into the filament during high-detail areas of the print.
3. Temperature and Cooling
-
Hotend Temperature: * PET-CF: 280°C – 300°C
-
PPA-CF / PPA-GF: 300°C – 320°C (requires the high-temp capabilities of the H2/H2S series).
-
Chamber Temperature: If your model has a heated chamber (H2S/H2D), preheat the chamber to 70°C – 80°C before printing to eliminate warping and improve layer adhesion.
-
Part Cooling Fan: Keep the cooling fan extremely low or off (0% to 15%). Slow cooling is essential for crystallizing engineering thermoplastics to maximize their structural strength.
Maintenance and Material Changeover
When your print is complete, do not leave the rigid filament sitting in the toolhead. It will cool down, retain its curved memory, and snap inside the extruder when the printer cold-starts.
-
Immediate Retraction: Once the print finishes, use the printer's utility menu to heat the hotend to printing temperature, click Retract, and gently pull the filament out while the nozzle is hot.
-
Purge the Path: Run a short length of standard, ductile material (like tough PLA or a dedicated cleaning filament) through the extruder. This flushes out any remaining abrasive glass or carbon fibers, preventing cross-contamination and keeping your hotend ready for your next print.
-
Reset Your Pathway: Once the rigid filament is safely stored back in its dry box, rotate your PTFE tube 360° clockwise to return it to its original position within the cable chain.
Summary Checklist for Success
-
Dry the filament at 90°C for PET-CF/PET-GF and 100°C for PPA-CF/PPA-GF/PPA-CF Core at least 4-6 hours.
-
Bypass the AMS and pull the PTFE tube out of the cable chain.
-
Rotate the PTFE tube 360° to create a relaxed, overhead spiral path.
-
Align an active dry box directly with the rear intake to reduce friction.
-
Use a hardened steel nozzle (0.6mm preferred).
-
Slow down retractions to avoid chewing the filament.
-
Purge the toolhead immediately after printing with a ductile cleaning filament.
By implementing this low-friction, tension-relieved setup, you can reliably harness the incredible strength of premium composites like Siraya Tech's PPA and PET lineups on your Bambu Lab H2 series printer. No more snapped strands, no more ruined prints—just pure, industrial-grade performance.
1 comment
Tevo
Great article. One issue though: you recommend purging after printing with PLA or similar filament. PLA is a low temperature filament and most of the rigid filaments are require much higher temperatures to extrude. So wouldn’t purging with PLA mean it’s unlikely to heat the nozzle enough to soften any remnants of the higher temperature filament you’re trying to clean out? Conversely, if you try to run PLA through but use a higher temperature to soften up the remnants of the rigid filament, you’re likely to cause heat creep with the PLA which will lead to clogged nozzles and extruders. So wouldn’t it be better to purge with something like ABS or ASA that extrudes at temperatures closer to the rigid filaments you’re trying to clean out?